Cordova Troubleshooting and Tips
Browser Simulator
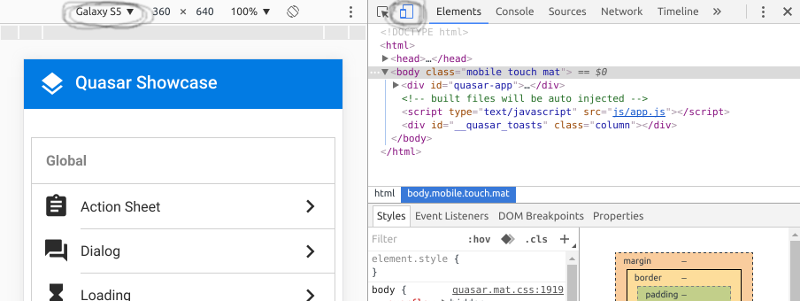
Use Google Chrome’s emulator from Developer Tools. It’s a fantastic tool. You can select which device to emulate, but keep in mind that it’s an emulator and not the real deal.
IMPORTANT
Also, if you change from desktop to mobile emulator or backwards, hit the refresh button as Quasar Platform detection is not dynamic (nor it should be).

Disabling iOS rubber band effect
When building an iOS app with Cordova and you want to disable the rubber band effect (https://www.youtube.com/watch?v=UjuNGpU29Mk), add this to your /src-cordova/config.xml:<preference name = "DisallowOverscroll" value = "true" />
Remote Debugging
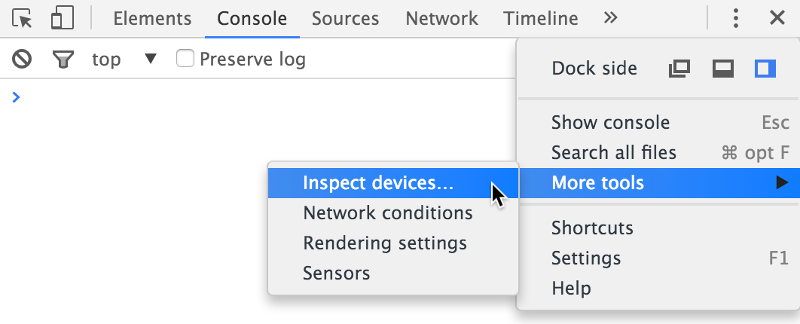
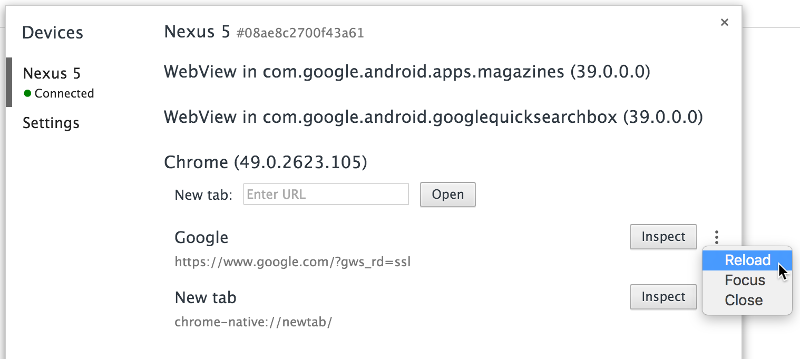
If you are debugging Android Apps, you can use Google Chrome Remote Debugging through a USB cable attached to your Android phone/tablet. It can be used for emulator too.
This way you have Chrome Dev Tools directly for your App running on the emulator/phone/table. Inspect elements, check console output, and so on and so forth.


Android SDK not found after installation of the SDK
Some newer Debian-based OS (e.g. ubuntu, elementary OS) might leave you with a Android SDK not found. after you installed and (correctly) configured the environment. The output might look similar to this:$ cordova requirements
Requirements check results for android:
Java JDK: installed 1.8.0
Android SDK: installed true
Android target: not installed
Android SDK not found. Make sure that it is installed. If it is not at the default location, set the ANDROID_HOME environment variable.
Gradle: not installed
Could not find gradle wrapper within Android SDK. Might need to update your Android SDK.
Looked here: /home/your_user/Android/Sdk/tools/templates/gradle/wrapper
Error: Some of requirements check failed
This could have two different reasons: Usually the paths aren’t configured correctly. The first step is to verify if your paths are set correctly. This can be done by running the following commands:$ echo $ANDROID_HOME
The expected output should be a path similar to this $HOME/Android/Sdk. After this run:$ ls -la $ANDROID_HOME
To ensure the folder contains the SDK. The expected output should contain folders like ‘tools’, ‘sources’, ‘platform-tools’, etc.$ echo $PATH
The output should contain each one entry for the Android SDK ‘tools’-folder and ‘platform-tools’-tools. This could look like this:/home/your_user/bin:/home/your_user/.local/bin:/usr/local/sbin:/usr/local/bin:/usr/sbin:/usr/bin:/sbin:/bin:/usr/games:/usr/local/games:/home/your_user/Android/Sdk/tools:/home/your_user/Android/Sdk/platform-tools
If you ensured your paths are set correctly and still get the error on
cordova requirementsyou can try the following fix: Replacing the Android Studio ‘tools’ folder manually
Setting Up Device on Linux
You may bump into ?????? no permissions problem when trying to run your App directly on an Android phone/tablet.
Here’s how you fix this:# create the .rules file and insert the content
# from below this example
sudo vim /etc/udev/rules.d/51-android.rules
sudo chmod 644 /etc/udev/rules.d/51-android.rules
sudo chown root. /etc/udev/rules.d/51-android.rules
sudo service udev restart
sudo killall adb
The content for 51-android.rules:SUBSYSTEM=="usb", ATTRS{idVendor}=="0bb4", MODE="0666"
SUBSYSTEM=="usb", ATTRS{idVendor}=="0e79", MODE="0666"
SUBSYSTEM=="usb", ATTRS{idVendor}=="0502", MODE="0666"
SUBSYSTEM=="usb", ATTRS{idVendor}=="0b05", MODE="0666"
SUBSYSTEM=="usb", ATTRS{idVendor}=="413c", MODE="0666"
SUBSYSTEM=="usb", ATTRS{idVendor}=="0489", MODE="0666"
SUBSYSTEM=="usb", ATTRS{idVendor}=="091e", MODE="0666"
SUBSYSTEM=="usb", ATTRS{idVendor}=="18d1", MODE="0666"
SUBSYSTEM=="usb", ATTRS{idVendor}=="0bb4", MODE="0666"
SUBSYSTEM=="usb", ATTRS{idVendor}=="12d1", MODE="0666"
SUBSYSTEM=="usb", ATTRS{idVendor}=="24e3", MODE="0666"
SUBSYSTEM=="usb", ATTRS{idVendor}=="2116", MODE="0666"
SUBSYSTEM=="usb", ATTRS{idVendor}=="0482", MODE="0666"
SUBSYSTEM=="usb", ATTRS{idVendor}=="17ef", MODE="0666"
SUBSYSTEM=="usb", ATTRS{idVendor}=="1004", MODE="0666"
SUBSYSTEM=="usb", ATTRS{idVendor}=="22b8", MODE="0666"
SUBSYSTEM=="usb", ATTRS{idVendor}=="0409", MODE="0666"
SUBSYSTEM=="usb", ATTRS{idVendor}=="2080", MODE="0666"
SUBSYSTEM=="usb", ATTRS{idVendor}=="0955", MODE="0666"
SUBSYSTEM=="usb", ATTRS{idVendor}=="2257", MODE="0666"
SUBSYSTEM=="usb", ATTRS{idVendor}=="10a9", MODE="0666"
SUBSYSTEM=="usb", ATTRS{idVendor}=="1d4d", MODE="0666"
SUBSYSTEM=="usb", ATTRS{idVendor}=="0471", MODE="0666"
SUBSYSTEM=="usb", ATTRS{idVendor}=="04da", MODE="0666"
SUBSYSTEM=="usb", ATTRS{idVendor}=="05c6", MODE="0666"
SUBSYSTEM=="usb", ATTRS{idVendor}=="1f53", MODE="0666"
SUBSYSTEM=="usb", ATTRS{idVendor}=="04e8", MODE="0666"
SUBSYSTEM=="usb", ATTRS{idVendor}=="04dd", MODE="0666"
SUBSYSTEM=="usb", ATTRS{idVendor}=="0fce", MODE="0666"
SUBSYSTEM=="usb", ATTRS{idVendor}=="0930", MODE="0666"
SUBSYSTEM=="usb", ATTRS{idVendor}=="19d2", MODE="0666"
SUBSYSTEM=="usb", ATTRS{idVendor}=="1bbb", MODE="0666"
Now running adb devices should discover your device.
 Quasar

